Category Archives: Shutters

Minolta-35 … I’ll have seconds

OK, so after the last restoration I will continue on with the next ones … which also needs the expected shutter curtain replacement.

This time I will not take apart the gearing section to remove/free the rollers to avoid having to reposition all the gears … also I looked at the the possibility of replacing the curtains with just taking the film plane cover off only … not. Might as well take the innards out to do an clean … especially all those tiny black bits of the shutter curtain that have flaked off all those years.

Roll the film!!!

I examined one of the camera’s that I have with the old curtains still attached to see where they sit. The first curtain lath was taken up on the spring roller, and the second curtain lath sat just before the thin roller.

OK, so lets play around with positioning.

Set the shutter mechanism in its released position … move the gears it necessary.

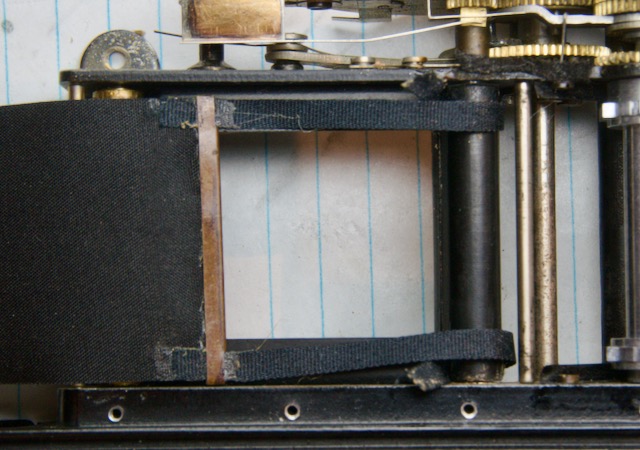
I placed the first curtain on top of the left roller to see how much material I had. This time I place the lath left screw hole so it is sitting on top of its spring roller and 0.4mm before the thin roller … then I fed the tape over and around the black roller. Glued both tapes on the roller and checked the lath so that it is parallel with the thin roller.

Glue the curtain to the spring roller on the left. From the bottom turn the spring wind up screw until it starts winding up the curtain … do not over do it.

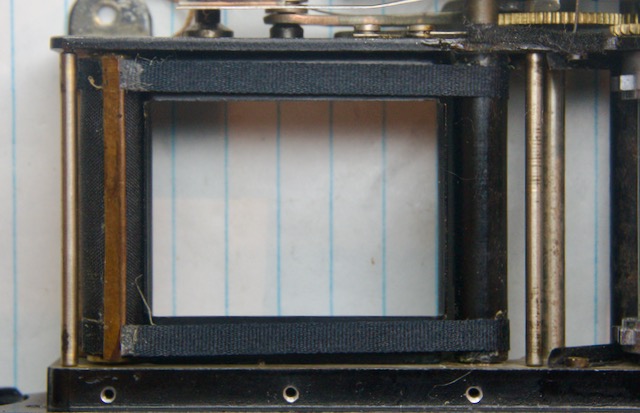
Wind up the shutter and release … watch that the first curtain moves freely. Next up is the second curtain. I positioned the lath to sit on top of the thin roller … and let that set.

OK, so now to check the shutter … looks good. The timing of the higher speeds was pretty good, but I ran into a problem with the low speeds.

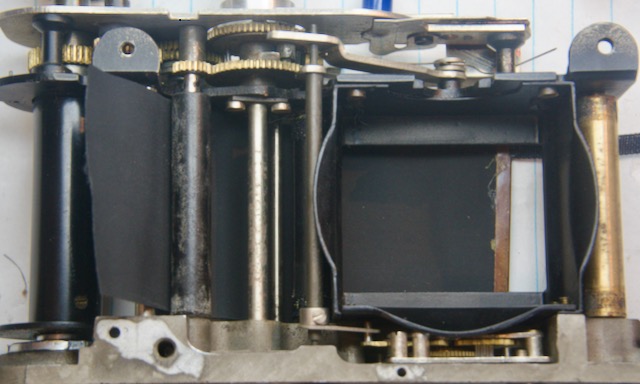
The speeds 1/25s and lower are controlled by the slow speed escapement gears. When the 25-1 speed is set … when the shutter is triggered the first curtain is released. A spring on the bottom of the camera is pressed which pushes the slow speed post upwards. When the second curtain is released the pin under one of the gears contacts the arm at the top of the slow speed post. This forces the arm to revolve. At the bottom of this arm it engages the gears of the escapement, thus slowing the release at the post turns.

What I found out is that if the second curtain lathe is positioned to the far left it will be seen slowly move across the film gate opening. So as the slow speed arm is rotating, the second curtain roller is slowly unfurling the curtain, before it is finally released. So this means the film is not exposed equally (underexposed on one side).

I have to remove the curtains and move the lath position further away from the spring rollers … I did figure out that the lath positioning from the previous post was correct, let it sit on the last bottom screw hole.

Back to square one.

First curtain tape gets attached to black roller. Reposition the length so that the lath is sitting on last screw hole and tension on tape is equal. Then attach the curtain to the spring roller.

Next up is the second curtain.

I attached the curtain first. Pass it through the guides then through to the roller. I sat the lath past the first one by about 1mm … then I attched the tape, making sure they both have equal tension.

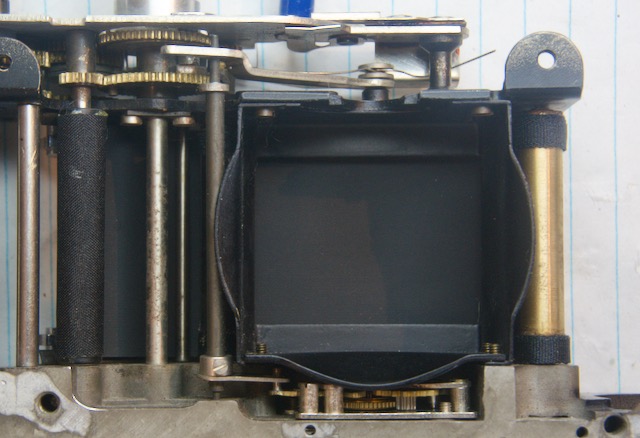
Speed check. First release the spring tension on both rollers. Then put two rotations on the first curtain and three on the second … check shutter speeds between 1/35-1/500s. I like to increment 1/2 rotations after this to speed up the timing.

SONY DSC

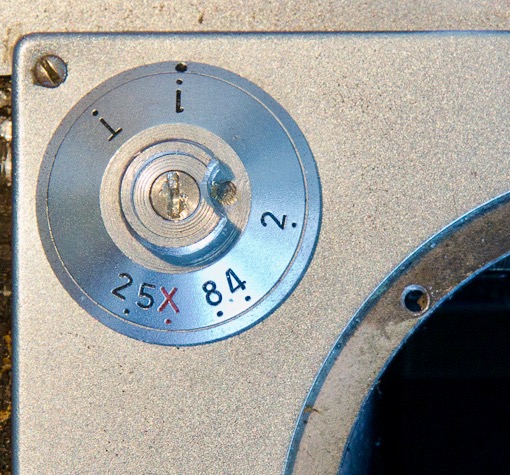
Once you are satisfied with the tension you can tackle the slow speeds. If the slow speeds are off, take of the slow speed dial cap (should be a single grub screw). In the middle there is a screw. There are three grub screws securing that inner screw, so loosen those slightly … turn the inner screw, no more than 1/2 degree increments … clockwise to slow it down.

OK, put everyting back together.

Rangefinder alignment tip … do the horizontal first as it does affect the vertical.

Horizontal is done by unscrewing the circular cover of the port, then turn the inside element. The vertical is done through a hole beside the viewfinder window. Take off the large screw and insert a small screwdriver to turn the grub screw.

Minolta-35 … I stuttered with this shutter

Ok, I have been putting this off … every year I tell myself that I should just do it … well, time to document replacing the shutter curtains on the Minolta-35 rangefinder. A decade ago one of the camera’s that started this blog was the Minolta Minolta-35 rangefinder camera.

As I mentioned long ago, one the biggest issues with the Minolta-35 rangefinder cameras is the shutter. Most cameras that you will encounter will have a non-working shutter, or that the shutter leaks like a sieve … and this is due to the compound that was used to coat the cloth. It wasn’t made to last, so many Minolta-35’s on the market will require a shutter curtain replacement sooner than later even though they might be listed as “working”.

Preparation goes a long way when dealing with this type of fix … so first look at Nobby Sparrow video and see how he is dealing with a Leica shutter replacement (don’t take specifics as the Minolta shutter is different). Then you can look at Michael Crawshaw video , he talks about his experience with the Minolta-35.

Then go back in time to my early posts about servicing this camera … some have replaced the shutter without taking out the innards, but I have found it easier to have more access.

Tools:

  • Glue
  • shutter material
  • ribbon tape material
  • curtain lath, just reuse the old ones
  • painters tape
  • etc … etc … etc.

If you happen to have the shutter still in the camera take note on the position of the metal lath (Note: prior to this replacement post I replaced the curtains on the second Minolta that I picked up … so this may not be the correct position … I will explain later).

In Michael’s video did not take the insides out to replace the curtains. I decided to take the insides out to give a good cleaning, and also make the shutter replacement a little easier do to … you can look at Minolta-35 – the shutter and speed gears for the disassembly notes.

Ok, so back to the shutter curtains …. measurements.

I have a couple of Minolta-35 model II’s with the curtains still attached when I bought them … taking them out left a lot of crumbled bits of old rubber. One of them “looked” OK, but using a light I can see many pinholes.

The width of the curtains is 32.3mm. Unlike a Leica rangefinder, this curtain does not use a lath with the tape attached to the outer ends … the Minolta shutter curtain has a U shaped lath the same width as the curtain and the tape is directly attached to the curtain going through slits cuts at the ends of the lath.

I measured the degraded curtains that I yanked out of the two cameras that I have. The first curtain is 64mm + 61mm tape … the second curtain is 84mm + 79mm tape.

The metal lath that forms the front straight edge of the curtain is a 0.4mm thick folded aluminum. Half of the camera’s that I have encountered have lath’s that use three rivet to secure it and the tape to the curtain … the others just had the lath glued on.

Ok, lets goooooooo …. now I will have to warn you I did not take pictures during this part … things that I will described have already been shown in previous posts …

Drill out the rivets with your handy 0.5mm drill bit. Clean out the old bits of curtain from inside the lath with a very thin blade … this should also open them up a bit.

The rollers are only 33.75mm wide , so we want to keep the curtain shorter than that. We will cut a length of 150mm curtain. The curtain material I got from Aki-Asahi is silk with one side rubber coated. I found that cutting with silk on top made a cleaner cut.

Next cut the tape. Depending on how much you want attached to the curtain, add +5-7mm.

I glued the tape to the silk side of the curtains … there seems to be no consensus to which side better. Let sit until the glue cures. Add some glue to the inside of the lath, though not the easiest thing, then slip it onto the curtain … give the laths a crimp to close onto the curtain.

Sooo, examining how the old shutter curtain wraps around the black rollers, I can see that a lot of material is attached … these rollers are thin so the curtains need more grip to stay on … looks like 16-19mm of curtain is glued, so it will have a full wrap … hmm, makes for difficult gluing in a confined space … or you make the curtains shorter, which will reduce the amount of curtain secured to the roller … hmm.

As I already took apart the top before I know that the second curtain roller is easily removable, and the first curtain can be pulled away from engaging the other gears … so this means I can start gluing to get a full wrap, then set the rollers back into proper position.

The inside rollers hold the first curtain … curtain is attached to the left side the spring roller, this is an easy glue. From the bottom, turn the screw/nut to wind up the spring so that the curtain gets pulled over. Make sure the lath is straight.

Glue the tape to the inside spring roller. Makes sure they both pull straight … no one likes a crooked lath.

Then feed the second curtain over the thin roller and through the black rail guides. The front edge of the second curtain should be 3mm past from the edge of the first curtain edge. In my case the lath is 2.6mm wide, so I need to place it just past the back edge of the first curtain lath.

Glue it to the right-most black roller.

The tape goes over the thin roller and glued onto the far spring roller … wind up the spring and check that both tapes pull straight.

Let it dry.

Ok, so now …. ehhhh … set all the gears in a shutter released position. The first curtain lath should sit on or just before the last bottom screw hole (this appears to align with just getting past the film plane opening), and the second lath curtain sits on top of it. Lightly wind up the black rollers to take up material … then put the top plate back on.

Easier said than done.

Now for adjustments, cause putting the top plate back on just throws of the gears … put in one plate screw on the front. Now you have some play to pull out the first curtain roller to reposition the gears. When that is ok, put the left screw on the plate and loosen the first one … then you can adjust the second curtain roller gear without disturbing the other roller.

Secure the top plate. Add some spring to the roller springs … Rick Oleson says 9 turns of the first curtain and 7 on the second … and see if the shutter is moving correctly. Wind up the shutter … you should not have any gap between the lath to let light through.

Now you can play with the spring rollers to get them travelling at the correct rate, start with 1/35s … then check the speeds of the others. The slow speeds from 1/25s are controlled by the slow speed dial … unscrew the cap and loosen the grub screws … turn the inside screw to adjust speed.

Another … Seiko shutter.

There is s shutter hiding somewhere under this mess …

I gotta Mamiya … and it has busted parts … so I got another Mamiya … and it also has busted parts but not the same busted parts as the other Mamiya with busted parts.

The Mamiya Magazine 35 is the camera I am talking about. It has a Seikosha MXL shutter that is not working.

A number of older Japanese cameras used this type of shutter like the Minolta Autocord … hmm, this image I took 9 years ago when I first started this blog.

Ok, so back to this Mamiya … I got one and it had a problem (yeah what else is new) with the front of the lens. The front ring dials were loose and the lens label plate was missing … the aperture was hard to move …. shutter does not fire and who knows what else is really going on under that.

Ok, so lets get going … so first remove the magazine.

To just take a look at the shutter mechanism you can get access just from the front … but probably you will need to get deeper so you might want to jump to the section where I describe taking the lens/shutter off the body.

Unscrew the front element group … there could be notches for a spanner or you might have to use a rubber tool to grip it.

The front rings are supposed to be attached to the shutter cover plate but in this case some of the screws are no longer attached … ah, now I know why the front rings wobbled.

For some reason the design has the screws on the underside … hmm, the screws must be somewhere in the shutter … well that would probably be the cause of the shutter not working properly.

The shutter cover plate has a locking D thing … so turn it to the open position and then turn the plate to mate with the cutouts.

The speed cam sits under this. Note its position on the shutter and then remove it.

Note how the various rings fit together.

Now we can see the shutter to look for those missing screws … and also clean it up.

Remove the bottom end of the high speed spring on the cocking ring.

Lift off the shutter release lever (at 8 oclock) … note the spring attached to it.

Remove the high speed spring (it is beside the red lever)

[Yeah, I forgot to take a picture] Remove the shutter cocking ring to be able to manually open/close the shutter. The leaf lever is at 11 o’clock and has a tension spring on the right side, and a flash trigger contact on the left. Move both out of the way so you can push the leaf lever an keep the shutter open.

At this point I am able to feel and see the movements of both the shutter and aperture blades. In this shutter’s case, both have a nice shiny coating of something.

Best to remove the entire shutter from the rest of the body.

… from the back, remove the long aluminum L bracket – three large screws.

Take the back cover baffle off – four screws … pull it off.

Note the two springs … easier to unscrew the central post and then remove the springs.

Unhook the spring on the right lever.

From the front remove the four large screws and pull the shutter/optic assembly from the body

Ok, back to the back … with a spanner unscrew the outer notched ring (the inner one is the rear element … you can take that off first if you want)

Pull the shutter/optic off.

The various rings and levers may fall off … if they have not, look at where/how they are positioned.

Lift off the shutter charging ring/lever.

Lift off the outer casing

Lift off the shutter release ring/lever.

Lets just get straight to the shutter blades and aperture

Unscrew the flash socket attached to the side of the shutter.

From the back remove the three large black screws (short screw is by the flash lever)

Push the shutter out …

the shutter blades should fall off if they are clean.

… note that there are 6 blades and 5 posts … the last blade sits over the first blade.

Ok, in this image the shutter lever (with the spring) is still attached as I forgot to remove it.

The aperture blades are under a cover plate.

Set the aperture wide open

Remove the three screws lift off the plate

Remove the 5 aperture blades

Mark the bottom plate so you know what position it sits at when you put it back on.

To remove the bottom plate … go to the back and remove the two screws holding the aperture ring/lever on .

Now clean up all the components of the shutter … ie. blades, retard escapement, levers … and put it all back. Now that it is clean you can check the shutter timing.

Remember … the Learn Camera Repair website has the Nat Cam course on how to repair cameras and shutters (like this one).

Ticking time …

One of the early Japanese shutter manufactures was Seiko.

So back in 1881 Hattori Kintarō opened his watch making shop Hattori Tokei-ten. In 1892 he opened his Seikosha plant to make watches and clocks. By 1901 the company was the largest clock/watch dealer in Japan.

The company primarily made clocks and watches … but in the 1930’s they company started distributing cameras … also during this time the Seikosha plant starting making their own leaf shutters.

The first was the Magna shutter based on the Gauthier Vario shutter. These appeared on many cameras made by Kuribayashi. Then around 1935 they make a Deckel Compur copy called the Seikosha.

The Seikosha Rapid came out in the early 1940’s. It and it’s variants where found in many Japanese cameras … like the Minolta Autocord and the Mamiya Magazine 35.

Hattori Tokei-ten evolved into different companies … like Topcon, Epson and of course Seiko.

YF … GO … eh, no SLOW

One issue that I had with the camera after I replaced the ribbons was the slow speeds. Some of the higher slow speeds where OK, but hitting the slow speeds was a problem as it sometimes did not work.

The speeds 1/60 and higher are controlled by the timing of the second curtain release. The lower speeds are controlled by a slow speed escapement that is sitting on top of the bottom of the camera.

A separate speed dial changes the position of a swinging shaft that engages the slow speed escapement. The shaft is rotated by the movement of the second curtain roller, and thus turns the slow speed escapement.

Many Leica copy camera’s followed this Barnack design.

A flat spring on the bottom of the camera raises/lowers the shaft. When the top speed dial is set to 30X the spring on the bottom gets triggered when the shutter is open … it will push the shaft upwards. The top of the swinging shaft there is an arm attached that engages an tooth on the second curtain roller (shutter speed dial post) that is rotating by the roller movement.

When the shutter is released a flat spring on the bottom of the camera is pushed upwards … which raises the swinging shaft arm so that it can engage the tooth … which will push against it, thus induce rotation that moves the gears in the slow speed escapement.

The illustration is a bit incorrect, as the tooth is hidden under the larger arm that you can see.

The arm on top of the shaft changes position as the slow speed dial is changed. I didn’t take a picture of the back of the dial, but it has a ring that pushes against the swinging shaft, and also connects to the slow speed escapement to run only the star wheel (for 1/8-1/30s).

After the shutter release is completed the flat spring is lowered, the swinging shaft drops down and the top arm can no longer interfere when the shutter speed post arm.

OK, now that I explained that I will make mention of the issue that was located that caused issues with the slow speeds … as I noted in my previous post I already did some repair and cleaning of the slow speed escapement, so that should not have been the problem.

Looking at the metal arm plate attached to the top of the slow speed shaft I can see the leading edge is worn down.

I suspect that when the swinging shaft was in its lowest position (slow speed not engages) that top plate encountered the speed dial when it rotated … this eventually wore down the metal so it no longer had a 90 degree edge … so this causes it to slip over instead of engaging it when the slow speed are being used.

To fix that problem I reshaped the flat spring on the bottom of the camera a bit to ensure that the shaft lays lowest when not used … flattened the metal plate on top of the shaft so it was parallel with the top (it was lifted slightly at the end so I am guessing it was constantly being shaved down when the tooth returned position), and then I lightly (did not want to remove too much material) filed the side of the metal arm and tooth to get rid of any “ramp” … make a sharper edge at the tip.

After all that the speed dial arm was more consistently engaging the slow speed shaft plate at all low speeds … the most sensitive to this arm/tooth connection appears to be 1/4s.

[Missing picture, sorry forgot to take one] To adjust the timing, unscrew the cover of the slow speed dial. Here there is a centre screw and an outer ring. Loosening the ring and turning the inner screw will change the position a cam that is pushed against the swinging shaft.

This slow speed mechanism is a common setup on the typical Barnack type cameras, so you can read up on a Leica III repair and get similar info.