Tag Archives: Olympus

It just keeps advancing …

I was just testing out the Olympus OM-2 shutter when I notices that the multi-stroke advance lever sometimes slipped. Now I have read online that many Olympus users do have to advance the lever a couple of times to charge the shutter, but this one sometimes free flows.

So lets take a look.

I took the top off … again … to get a closer look at the gearing.

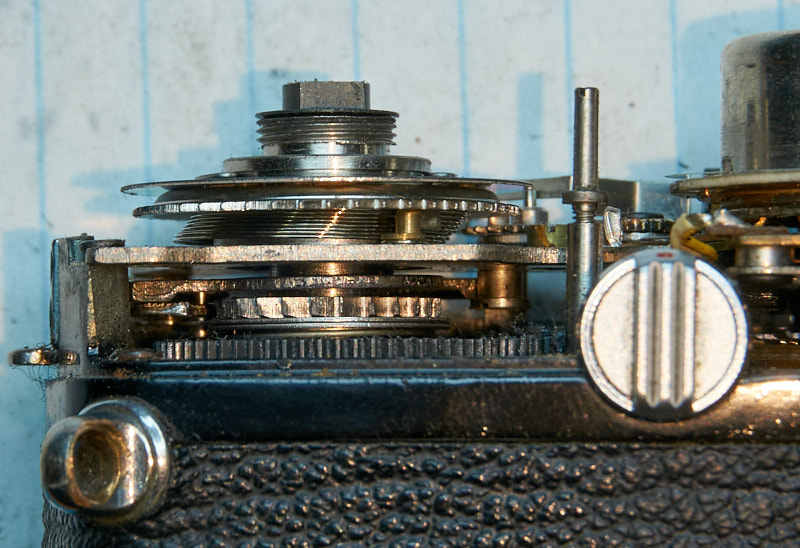
Ok, so what do we see here … ignore that dark gear on the bottom, we are interested in the brass one just above it. If you look carefully you will see that the teeth are worn.

This is a pawl mechanism, as you push the advance lever a pawl engages a tooth in the ratchet gear and turns it. With the OM-2 the pawl revolves, with the advance lever, to turn the ratcheted gear. If it does not engage the first tooth, the advance lever will return, and then you will need to advance further, engaging the ratcheted gear again to get to the end of the cycle.

If the advance lever is really forced it will cause the pawl to slip out of the tooth … which will cause wear on both edges that are engaging … eventually over time you can wear both down so that they no longer have a grip.

I pulled out the component to see if I could get a better look … just remove the three screws on top … sadly I took a picture of the wrong side for you all.

You can see the dark gear on the bottom … and the pawl mechanism above it.

This camera has dual pawls that are not spring loaded. They appear to engage the ratchet by some light pushing force when the advance is turned.

Without taking everything apart, I just used a fine file to put more of an edge on one side of the pawls tooth … this did help a bit … the real solution is to replace both ratchet gear and both pawls … or possibly take it apart and use a Dremel to reshape the tooth?

Well, just have to live with a really multi-stroke advance.

… and remember, if you cannot advance the the winding lever using the Force to get to the end is not the solution. Winding levers don’t tend to get stuck for no reason !!!

Olympus OM-2 … I’m seeing spots

Ok, so I gotta OM-2 MB. It needs a bit of body cleaning, some checking of electrical functionality and bits littered in the viewfinder.

The OM-2 relies completely on the battery, so having fresh batts is best. One thing that Olympus built in was a mechanism to reset the mirror/shutter if the camera loses power. So if you are looking at the camera and see these red asterisks, you should read the User Guide to know how to use them.

While looking through the giant viewfinder I can see it littered with black spots. Some of them where on the focusing screen. There again, Olympus was great enough to design the OM’s with an interchangeable screen. A little flick of the switch and the screen pops down. Use a blower to clean off stuff … if you have to you can use a soft brush.

One soft spot on the design is that there is some foam sitting on top of the viewfinder window that degrades over time and then drops bits of stuff … well time to open it up.

DSC00694

The film advance lever has a black cap with two holes you can use a spanner wrench on. The black part is just a thin piece of metal that is glued on, so it may pop off. You can them pull off the advance lever.

The rewind knob has a screw under the arm … don’t remove it. Open the camera back and jam the rewind fork, then unscrew the rewind knob. You can put a piece of tape on the exposed top of the fork to keep it from falling down.

The flash socket has a ring screw that you can use your tweezers to unscrew.

DSC00695

Remove the two screws at the bottom of the rewind section.

Spanning tool on the securing ring for the film advance post. Note the washer sitting on top of it.

Pull the top off.

DSC00696

Note the spring on the left side … remember to put it back. There is also a clear plastic washer on the exposure comp dial. The flash post has a black plasic spacer and a metal one underneath it.

You will see that the flash connector has a lot of black foam under it … it probably is brittle and gooey. Remove the two screws, and carefully pull it off (with wires intact). Give it a good cleaning. You will need some replacement cushion material when you put it back.

DSC00697

Two screws are left that hold the viewfinder port on. Now you can take that off and clean it up … note more wires. This will also reveal the back of the prism, which you will also need to clean.

Now put it all back.

When screwing the rewind knob back on, the spring clip can move out of position so make sure it is aligned before you finally tighten it.

When you slip the top back on, you will need to pay attention to wires that have moved out of place. Tuck them back. Also note that the shutter release pin is a bit free moving, so keep an eye on where it is. If everything is sitting right you do not have to put much force on the top plate to make it sit back into position.

OK, the bottom … I didn’t need to go there. I did pop the bottom off and took a look … there are some images of this on the web if you google “OM-2 stuck shutter”, if the reset does not work.

OMG … Yoshi.

What do you get when you put together a Mechanical Engineer, and a photography enthusiast who built their own camera … Yoshihisa Maitani … actually before he became a Mechanical Engineer, he built a camera, and also patented design upgrades for his Leica IIIf.

Yoshihisa was spotted by Eiichi Sakurai, who happened to be Director and Head of Camera Development at Olympus. In 1959 he joined Olympus. A couple of years later he was let loose to design his own 35mm SLR … well he was the guy who designed the first Olympus SLR camera, the Pen FT and lead the way to the famous Zuiko optical lenses. Later on he also designed the awesome XA and Stylus (I’ve had both).

Anyway … this post is about OM (though the Pen would also make a great story).

yoshihasaMaitaniAfter his success with the Olympus Pen camera and Zuiko lenses, Yoshihisa was the chief camera designer and in 1967 endeavored to make a full-frame 35mm SLR. Like the Pen, he wanted something smaller, quieter, better than all those other SLR’s out there … it also needed to be a versatile system of lenses and accessories designed around it to be able to take pictures of everything.

5 years later Olympus brought out the M-1 system … well for a short time it was called that until Leitz found out … OK, lets now call it the OM-1.

All mechanical (it did have a light meter) … it was about 30% smaller and lighter than other SLR cameras. The camera was still designed to be tough enough to hand high shutter rates and also be adaptable to numerous accessories and lenses.

One thing that always throws me off is that they moved the shutter speed dial as a ring in front of the lens (kind… but since they put the high/low speed control mechanisms at the bottom of the mirrorbox, it now it makes sense why the speed dial is where it is.

Your left hand can adjust shutter speed, focus, and aperture (even stopping down the aperture) … with an Olympus OM-1 your right hand is just a side-kick.

OK, so lets jump to the OM-2.

Same body as the OM-1 but this one added semi-automatic exposure. Of course they really had to be on top of things, so they made an OTF metering system … WTF … off the film plane metering. The camera had multiple sensors that would read light reflected off the crazy QR code looking pattern on the shutter curtain, and also ones that would read directly from the film (they researched all the various film types for their reflectance and found very little variance) … even with flash.

Oh, and the 97% viewfinder is huge and bright. There are three different exposure displays that switch out depending on what mode you set with the switch.

Compared to other cameras of this time, it is an awesomely designed camera … I think the only complaint anyone has about the early OM series is the crunchy film advance mechanism.

The particular model that I have is the OM-2 MD … the MD part is not labeled on the camera but the bottom plate has the removable cap for the motor drive coupling.

DSC04635

Olympus 50mm clean out

Since I just acquired an Olympus SLR, I needed a lens to go along with it. I was able to pick up an Olympus F.Zuiko Auto-S 50mm f/1.8 that needed a cleaning.

fZuiko50mmElementsThe F means the lens has … hmm, ABCDEF … 6 elements. It’s always handy to hunt down an illustration of the elements and groups, cause if you put them in the wrong order or flip one of them around, you ain’t got much of a good lens.

With this particular lens there was black flakes littered between most of the elements, so this means I need to take it apart.

DSC00683From the back first … just to be different.

Ok, remove the three screws.

You can now lift the entire mounting ring off.


DSC00686

The rear element group is encased as a complete unit.

Unscrew it.

Hmm, in my case I could not get this to move … the last element is secured on by a threaded ring … unscrew this to get into there.

Since I could not get this group removed, I could not get to the inner element to clean it … so now I have to go in from the front.

DSC00681

The name plate ring has two notches … so unscrew that using a spanning wrench.


DSC00692The inner ring pulls off.

Be aware of the ball bearing on the aperture ring below it … you don’t want to loose that.

DSC00691You can see the holes where the bearing will sit.

These are the click stops for the aperture ring.

Note the little lip … it sits in a slot. Remember that when you put it back on.


DSC00690

Pull off the aperture ring … watch the bearing (not pop out and bounce around on your table).

DSC00689Note the arm sticking out of one side … that arm couples with the aperture ring.


The front lens group is also encased as a complete unit … but, it is not so easy to get them out as one.

Use a rubber grippy tool to unscrew the group … do not grasp the outside as this will not move.

DSC00685

What might happen is that you unscrew the top part.

Then you have to unscrew the rest of it.

DSC00688

DSC00684Here is where you should remember to look back at the first image in this post.

Warning: the middle element is not secured so it will fall out with a spacer. Best to loosen then flip over so everything doesn’t just fall out all over the table.

Note how the elements are arranged.

Now you can get to the front of the rear group.

Check out the aperture and mechanisms.


Olympus … Release the Kraken !!!

Somebody gonna getta birthday this year … their 100th birthday to be exact.

I just realized that I have not done a historical post about Olympus, and now I will … though I won’t be really repeating what they have already said.

Here is the brief for those that can’t be bothered to look over that link:

  • In 1919 Takeshi Yamashita establishes company named Takachiho Seisakusho.
  • First company logo name was Towika.
  • They made microscopes and other similar products.
  • Then a couple of years later they thought Olympus was a cooler name.
  • In 1936 they decided to make a camera … I am not exactly sure why.
  • 1949 Olympus Optical
  • Some time in the 50’s they thought a camera that can take a picture of your gut was a good thing … so they made the first practical gastrocamera.

Uhhggg, I just got bored of this … blah, blah, blah … I am just repeating info you can read online … just go and Google.

Ok, so the story is that Olympus is a optical imaging company … very well balanced in the medical field and the photographic field.

I have always thought Olympus has the coolest looking cameras and lenses … they didn’t seem to fit the same mold as everyone else. Like lens odd focal lengths of 350mm, or the large handful of macro lenses … and who puts a shutter speed dial on the front of an SLR lens mount !!! I still yearn to have an OM-4T … not sure why, but I want one.

Hmmm, memories of the late 90’s trickling in my head … getting my hands on the first real digital “camera” … it actually felt and functioned like a camera … the C-400. That’s when I thought this whole digital thing could actually take off.

… and don’t get me started on the O-Product.