<Man thumps chest>


<Man thumps chest>
Since we are on the topic of the Minolta-35 I pulled out an old one, that is my wife’s camera, to check the frame size for Paul. In a way I have become obsessed with this camera … even though I put it off for many years, it has always nagged me that these cameras were sitting on my bench staring at me.
After I looked at the camera for Paul I noticed that the lens (last version) has a loose aperture dial, so I needed to figure out how to take the front apart. I have taken a number of LTR lenses apart and they are not that difficult, just unscrew some stuff from the front and back … this one has proven more challenging.

There is not a lot of info about the innards of this lens … I discovered a Japanese website of someone who took this lens apart to clean and polish it … whoever they are, really likes to take them apart, and took some good images of the bits … but, skips on the details on how the disassembly was done.
OK, so taking some visual clues and translated text I figured out how to get to the loose ring on the front.
5 elements in three groups … the front 3 elements and the 2 rear are encased together … hmm, not sure why I added this.
From the back … hmm, I say that a lot …

Pull out light baffle (not shown in this image as I already took it out).
Unscrew the inside outer locking ring with a spanner wrench. This holds the inner lens body. Watch out for thin metal shims.

The aperture ring has three grub screws. Loosen them and then unscrew the ring towards the back.

The front lens label plate is also secured with three grub screws. Loosen them, and then unscrew the ring towards the front.

Remove front and rear element cells.
The aperture connection ring has a pin screw (the one with the large head) that connects it to the top plate of the aperture section.
Unscrew the pin, then slide the ring off.

The internal aperture section consists of a top plate, blades, and a back cover plate. The back plate is held on internally by three grub screws on the outside.
Loosen them, then nicely push out the innards.

Remove the blades and clean them … I was surprised by the amount of brown stuff that were on these blades and especially around the pins, which is a good reason why do you do not want to just flush a lens with fluid or just clean off the exposed parts … it would have moved the brown stuff all around the inside … and just cleaning the exposed blades does get to the crap hiding under the pins, especially if they are shutter blades as this crud is why the speeds are slow.
The outer body can be taken apart if you want to replace the helicoid grease. Make sure to make alignment marks on ALL parts, as this will wish you had done this when you put it back together.
If you have a focus lever, remove it.

Focus ring … loosen the two outside screws, then remove three top screws.
Pull it off.

The depth field ring is held on by four screws in the back. Slide it forward.
Five grub screws secure the mounting ring to the internal body. Carefully remove them.
Mark the inner outer before pulling it off.

Ok, the last two parts … There is a stopper grub screw that will get revealed when you twist the parts. Remove it and twist off the two parts slowly … note the placement when they separate and mark it, so you know the starting point when you put these two back together.
Tech Tips section:
Have a camera body handy as you can use that to check if you got the helicoid section aligned properly.
Do not force two helix threads to fit eachother … they should want to, otherwise you can damage the threads.
When dealing with ring with the five grub screws, do not use a lot of force on those grubs (or you will break the head and then you will be smashing your head against the work bench) … if you get a lot of resistance then you probably do not have the holes aligned.
When you put the aperture blades back on the rear plate, the centred pin goes down. Have patience and do not use a magnetized tweezer.
Put the aperture section back in with the aperture wide open … the notch aligns to the left side of the opening.
Before tightening grub screws, make sure that the rings move freely.
Oh, and I finally figured out how to use this WP editor with images and text.
Well, I had done some cleaning on a Chiyoko Super Rokkor 5cm f/2 LTM lens … and I did not take any pictures.
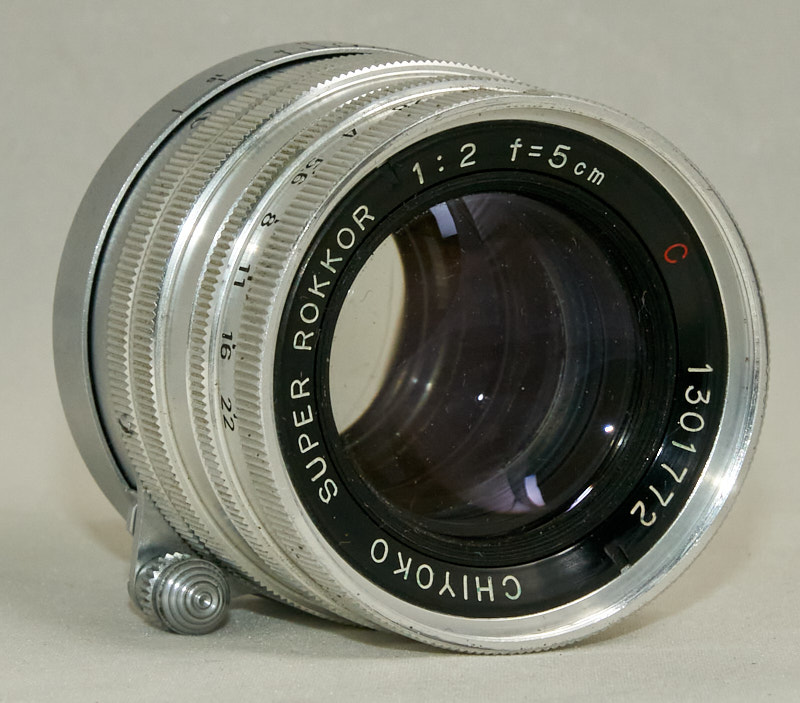
So, I will just have to describe some things about it.
Like most LTM lenses the disassembly is quite similar … there is a ring in the back that unscrews to release the inner unit from the focus mechanism. The lens elements and groups are held in by ring screws or the casing is threaded.
What is a bit different on this lens are the “containers”. With most lenses each element or cell group is secured by a ring screw … hmm, this Chiyoko lens gave me a surprise.
Minolta decided not to do this … this lens has encased the elements into three brass tubes. The front two elements, second two (stacked), and the last three. They are secured in place by a single front (name ring) and rear screw ring.
Hmm, odd design … especially since it required very precise milling as they are not easily removed.
Being separated is not all that bad.
I had posted before about lens element separation, so I thought I would follow up with real life effect of this. I was fortunate enough to get a hold of another lens that has no lens separation, so I thought I would take some picture using them.
Both are Minolta Chiyoko Super Rokkor 45mm f/2.8 LTM lenses. The one on the right shows separation of the front element group by the foggy outer ring.
Lets see how usable the lens is … using my Sony NEX-6, APS-C 16Mpixel @ 400ISO.
Wide open at f/2.8 … SOOC. The sun is in front of the camera. No lens hood.

Notice that there is a drop in contrast as there is a lot of internal light reflection, and a slight drop in sharpness.

The shot with the good lens looks … good.
I took the first image and used the dehazing tool in Lightroom

Hmm, not bad … some sharpness is still obtainable in the centre … this is a 100% crop

I did take some shots with the lens stopped down to f/16 … I didn’t bother to show examples as the images appeared too similar, just take my word for it.
Soooo, if you have just outer separation you could use the lens for that slightly soft portrait imagery that many people replicate using digital post processing plugins/filters … well you can be the judge of that.
