Category Archives: Tools

I started reading a glue label … and I could not put it down.

OK, so there has been discussions on the Learn Camera Repair Facebook group about glues … a commonly recommended glue is Pliobond, which I have been using for many years. I was reading the Pliobond fact sheet from Ashland and it was a very detailed explanation about using this glue … well, this glue is not easily available outside of the USA, so there has been a number of the discussions about an equivalent.

I had mentioned in one discussion about a glue that I saw in a NobbySparrow video … Konishi G17. Triggered by this, Adam Fung, owner of Polar Bear Camera in the UK, recently imported Konisha G17 glue to try out. It appears this glue is popular with many Japanese camera repair people.

Adam is smart enough to know that if he was to stock a product is has to be a good product … so he sent a package to me in Canada to compare with Pliobond.

First test … the smell !!! This is very important to many people as they have complained about Pliobond’s odor (personally I like it). G17 smells like “glue” … must be the cyclohexane. Not strong as Pliobond, and does not linger.

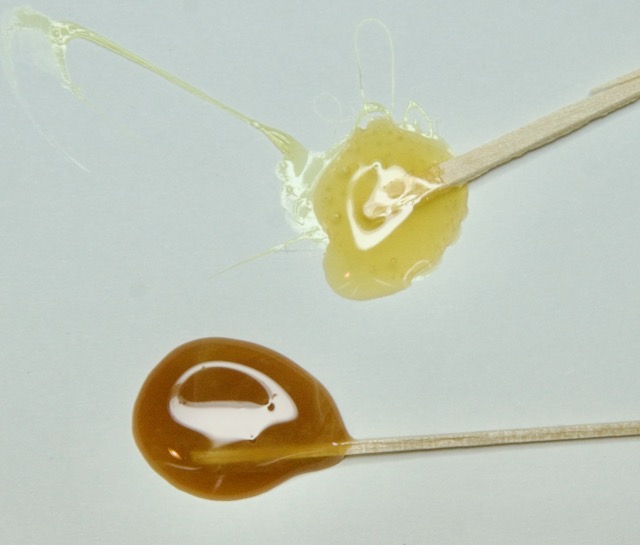
G17 is yellow and it appears to have less solids.

Tackiness … it is thinner. Probably due to having less solids in it, so it only produces very light, if any, strings . This does make it easier to apply as I don’t have to clean up as many trailing glue strings all over the place.

Reposition time … I put glue on one rubber side of an old shutter curtain, let it dry for about 30s, then rolled it over to attached it to the other end of the curtain. The Pliobond remained rubbery longer than the G17, so seems to give me more time to move it about.

The G17 glue on the paper hardened faster than the Pliobond, though both remained rubbery after 5 minutes sitting there.

Throughout this unscientific testing the smell of Pliobond covered up whatever the G17 was giving off, but I will say that it most people will be happy with the odor level using G17.

I added glue to the other end of the curtain and put them back together. After about 15 minutes I pulled the curtain apart to see how the glue held up … both stuck pretty good. The G17 stuck so well the curtain ripped … appears that the curing time is shorter, but I was still able to pull off the ripped part with a little more force.

OK, so I tried it on real job … I put a set of new curtains on the next Minolta-35. As it sets faster I had to speed up my work flow, but it was not so fast that I could not make adjustments to line up the curtain lath. Was able to clean off excess glue using IPA.

Ah, made a positioning error with one of the curtains … next day I removed it. The G17 held on very good. I was still able to slowly remove the curtain without ripping it. IPA was able to clean off the glue.

Overall … I like the G17, so now you UK’rs got some new glue.

It adhered well to the rubber curtain and rollers, much less smelly, and made a pretty good bond in a shorter time … though I probably it will not replace my Pliobond as I have a friggn giant container of it that will last me a couple of years …

Gutta get somma dat sap.

One thing that I keep encountering is bellows … well, that kinda happens when you buy a lot of folders. Now because of their age, the bellows tend to have worn material especially on the top folds were most of the wear’n tear tends to be.

The best solution would be to replace the bellows, but sometimes it is not practical … so many would try to patch the holes. I have one Isolette where the last owner used some sort of plastic “tape” material to patch up each corner … which now after some years has become brittle and is cracking off. This level of damage requires a replacement, but most of the time they are pin holes.

Ok, so search for a product that can “repair” the smaller holes but still be flexible enough to allow the bellows to move freely … my first thought was liquid electrical tape, but after trying some of that on some actual electrical wiring I realized that it will harden and become a bit stiff after time and can flake off with continuous movement.

Sooo, after surfing the web I found someone who tried Gutta (though they never followed up to say how it worked after their initial post) … so I decided to give it a shot, I bought a bottle of Jacquard Gutta Resist black.

Gutta-percha … so what is it? It’s a tree, and also refers to it’s sap. Joon Ian Wong wrote a great write up on the history of Gutta Percha. Today it is primary used by people who are painting on fabrics, especially silk. It penetrates fabric and forms a barrier to keep dye from spreading.

So I have been trying it … and so far it works great, pinholes are gone. It remains rubbery (unlike liquid electrical tape that stiffens) so it flexes with the bellows so it should not crack.

It should be used on the inside worn out areas, as it works best on a fabric surface that can absorb it … does not like to be coated on directly on the outside leather as it cannot be absorbed by the material. Apply multiple layers, and let dry in between coatings.

I let the bellows dry for a couple of days before testing closing/opening … no sticking of the Gutta, and the pinholes remained sealed even on the long folds on top that were really worn on the outside. I closed up the bellows and let them sit for a week … openend it up and no sticking.

… so now I need to make a 90 degree paint brush to make it easier to get into the corners.

Back … again Frank

Soo, I was going to put the Frank Six up on my Etsy Shop when I realized there was something wrong … the back did not lock on. Strange that I have not noticed this before, as I have had this camera for a while.

Looking over the camera it became obvious that the problem was a missing part.

The camera back slides on and a circular locking switch secures it to the main body. When I looked at the inside of the locking mechanism I noticed that there was nothing that could lock in.

I searched the entire Webiverse for an image of this part of the camera … and came away with only two … which only showed me a wide topped post … nothing I could really use to figure out the dimensions.

The body has a hook, and the back has a pin with a large flat head that locks in. You can see the circular scrape pattern that shows the pin movement.

Well, I am missing that pin on the back. I found a tall screw that fits the lock switch but it doesn’t have the right shape to keep from falling over and also engage the hook.

Ok, time to get the Unimat. First I tried to make a new post with a small threaded end, to screw into the locking switch, and has a wide top head to engage the hook … well my tools and skill let me down (probably more about my skill) trying to make it using stainless steel … and using softer metal didn’t have the strength.

Soooo, hmmm, I could use that tall screw that fits … but I needed to make a outer shell with a wide top head that that would hold the screw. Ok, so lets take some measurements … some guessing … some more measurements … and lets go.

The head I guessed was 5mm wide and 1mm thick … the lower post part is 3mm tall and 2.5mm wide. I would need to drill a 1.7mm hole through the middle of it for the screw, and then chamfer the top for the screw head.

OK, so I burned through a couple of prototypes and ended up with this little brass part … that screw is 5mm tall and 1.65mm wide.

This is what is looks like attached to the circular locking switch … and it WORKS !!

Sometimes, lifes a grind

Many years ago I picked up a Sigma AF 150mm f/2.8 Macro DG HSM lens for my camera. I was doing a lot of macro shooting while we were hiking around. I already had the Sigma AF 50mm, and a Tokina 90mm macro … but I felt the focal lengths were not enough reach.

Most of my shooting was handheld, so I did not notice a problem with this lens until I started carrying around a short tripod. The IQ of this lens is awesome but I started noticing that it had difficulty focusing when I was shooting on the tripod. My first thought was because of the lower light situations that I was getting into … but it was occurring even under well lit situations … hmm.

Then it stuck me … the tripod collar ring was causing it. Somehow causing resistance to the AF if it is tightened to the max. So I backed off from tightening it completely and everything was fine, except the lens revolving is not so secure.

I looked online and it appears that this was an issue that Sigma knew about … but my lens was out of warranty. So I lived with it … until today. I checked to see if the collar was out of shape … maybe pressuring one side. I made some (physical) adjustments to round it out … hmm, that wasn’t the problem.

OK, so what clamps this collar … there is a knob that is turned. The off centre hole engages a pin and pulls the two C arms together. When the knob is turned the pin is forced down, thus tightening the collar.

So if the AF is fine if the collar is not tightened full, then I just need to change the hole.

So to reduce the distance I took out my Dremel and slapped on a small grinding stone. Take some material off the hole very lightly … making it wider a bit … checking on lens … tighten collar … widen a bit more … check on lens … until the focus had free movement when the collar is fully locked.

… and most importantly there was enough tension to lock the ring on the lens to keep it from moving.