Tag Archives: Olympus-35 SP

Olympus-35 SP, inside the top

So next step, even though I didn’t have to, is to open the top of the Olypus to clean the rangefinder.

Note: for horizontal adjustments to the rangefinder patch you do not have to take the top cover off. Open the film back and you will see a screw in the top middle of the film plane. Unscrew this to reveal a smaller recessed screw. Turn this to adjust.

DSC00516

Use the spanner wrench to unscrew the cap on the winding arm, and then take the parts off. Open the film back and jam the rewind, then you can unscrew the rewind knob.

DSC00517

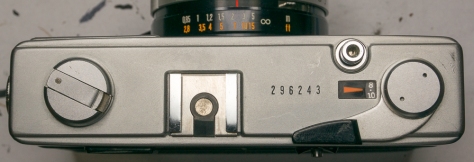
You will see in the above image that the top of the camera has scratches from the winding arm. Due to the cover securing nut coming loose the winding arm was not sitting high enough.

Using the spanner wrench again you can unscrew both sides before you can pull off the cover. Note that there is a wire that connects to the hot shoe, so try not to yank too hard.

DSC00518

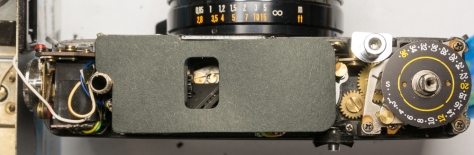
The rangefinder area is covered with black paper. You will also figure out if the spotmeter button is broken. In my case the plastic was broken, but there is enough of it to keep the button from falling into the camera.

DSC00519

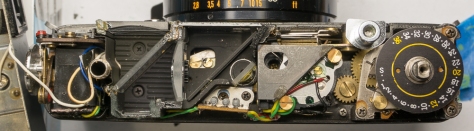
Carefully pull off the paper. Now you can clean the insides.

I did not fiddle around with figuring out what screw adjusts the vertical alignment of the rangefinder patch … but it could be the circular knurled black plastic thing in the middle lens (some others have mentioned the recessed screw between the diodes, but it is said that is not correct).

Olympus-35 SP … the shutter.

This camera had one issue … the self timer lever got loose and fell into the body of the lens, which cause other things to jam up. So now time to get to the shutter mechanism.

Tools, well you should be able to figure that out by now.

Warning … there are many unsecured things in this complicated shutter!!

DSC00520As I swore about before … the first thing to remove is the nameplate. On this particular version the nameplate is glued on … you might find a model that has this as a threaded ring, so check before spending the next hour trying to get it off.

DSC00522

So after prying it off (without bending it) you can now unscrew the front group of elements with your spanner wrench.

Under that you will see three screws that hold on the rest of the rings.

DSC00525

There are three rings that will come off.

After removing the screws, carefully take off the securing ring and then the shutter speed ring.

DSC00507

Once you get down to here, you will find this inner plate and underneath there will be some brass washers and a thing for the aperture ring steps

DSC00506

OK, so these are those things left over that you should now see … put aside the washers and the step metal thing,

Set the focus at minimum. remove the five screws holding the cover on, then take it off.

DSC00505


Remove the shutter speed cam plate.

Note its position.

Try to keep this camera on its back, as there are many shutter items that will fall out.

DSC00502

The shutter cocking ring, in the middle is spring loaded.

Note the many levers, gears, and things that connect to this ring.

Remove the ring.

The self timer lever is at 11 oclock and it has a spring to keep the arm in a clockwise position.

DSC00503This image shows it after I screwed it back on.

Self-timer gears are at 9 oclock and slow shutter speed gears are at 6 oclock.

When putting the shutter cocking ring back on you will need to move some levers in their set position … like the two at 1 and 2 oclock. Th ring should sit low enough that the shutter speed cam plate does not impede its movement.

You will need to move the shutter speed cam plate around to get the little arms to engage in the slots … before you put the cover plate on. Things should rotate cleanly after you put the cover on, if not, take it off and adjust things.

#%@&!!!!

I don’t often swear, but when I do I mean it … so WTF were these Olympus engineers thinking to use GLUE to attach the front plate on this SP !!!

I have worked on many cameras that are not as finely engineered as this Olympus SP, and they typically had a front lens plate/cover that unscrewed. So I spent the last 30 minutes trying to unscrew the dam thing (though I should have clued in that there is only one slot). Noting the scratch marks from someone who tried to remove it, I continued to do so thinking that it was screwed in crooked and jammed the threading. I gave up and thunk that there is something odd about this.

Some googling later I realized that it was possible that it is just attached with some adhesive. Welllllllll, it’s true. Olympus in their bright minds decided to attach it with shellac !!!

I will get back to this camera after I have calmed down.

Special G … Olympus-35 SP

Hmm, I buy broken cameras … just because they are cheap, and they need help. I find out about what they are after the fact. Sometimes I get surprised, like the Minolta Autocord … and it appears this new camera is also a surprise.

The Olympus 35 SP is a compact fixed lens camera made in the early 70’s … and it appears to be more than just a simple point & shoot film camera … at least from what I have read on the InterWeb.

Ken Rockwell … KR says this camera is the best fixed lens rangefinder camera and the lens is on par with the Summicron … and that’s all I’ve got to say about that.

OK, now that I got him out of the way lets get on with it. I’ve always appreciated Olympus products … I dreamed of owning an OM-4 Ti. The camera looks like your typical 1970’s single lens cameras … except that is labeled with an SP and a G. So you ask, what’s so special about that?

Olympus35sp_DxOThe SP in the model name stands for SPot meter (OK, that’s just my guess) … yes, this camera has spot metering !! and centre weight. The SPn and UC versions are the same camera with just minor changes.

The G is part of the lens labeling, Olympus G.Zuiko 1:1.7 f=42mm … the G is in reference to the number of elements. A,B,C,D,E,F,G = 1,2,3,4,5,6,7. Olympus liked to add this element letter on their lenses, which is a really great way of identifying the variants of the same camera. Hmm, 7 elements in 5 groups … something not expected to find in a camera with a fixed lens (except for the Walz Envoy 35, 7 elements in 3 groups based on image engraved on the top of the camera).

Now, it appears that many others have the same opinion as Ken … this lens (and camera) is really that good … and much cheaper than getting a Leica CL w/ 40mm Summicron. Many people on the Web approve this message.