
A common problem with many old cameras is the focus mechanism. Over time the lubricants on the focus helicoid gets stiff. This makes focusing difficult or not possible.
A couple of the Minolta Autocords that I have had displayed this problem. When the lube gets really gummed it makes it really difficult to move the focus lever.
This stage of the repair gets into lubricating the helicoid.
So, on with the show.
Tools: tweezers, spanner wrench, slotted screw drivers, a scribe, Ronsonol, Super Lube.
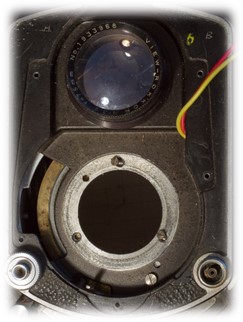
I am assuming that you have taken off the front cover (if not, look at my other post). Make sure the focus lever is set to min or infinity.
I forgot to mention in my Shutter post about the back of the front cover.
Turn over the cover.
You can now clean out this area with Ronsonol.
With a thin cleaning paper you can get under the Aperture/Shutter windows.
Now back to the focus of this post … literally.
 The first part is removing the shutter/taking lens.
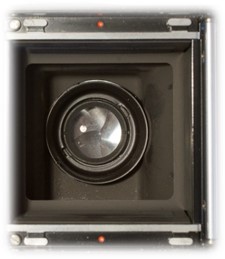
Open the film back.
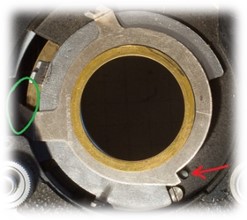
The rear of the shutter/lens is secured with a single ring screw.
There is a light shield around this, so just pull it out (you can turn it to loosen if it is not just pulling out).
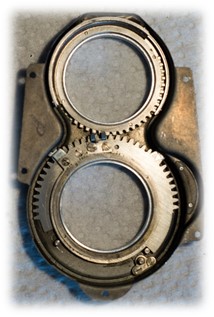
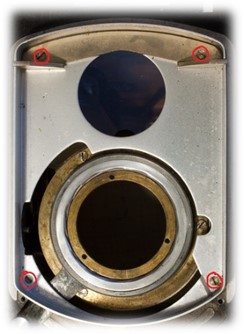
 Now you will have to use the spanner wrench to turn the outer ring (counter clockwise) off.
Note: The brass part in this image is the inner focus helicoid. Some people will just clean the outside of this, it really does not do a good cleaning, but it may be good enough to get the focus working again.
At this point there is nothing holding the shutter/lens from falling out, so don’t just lift the camera suddenly.
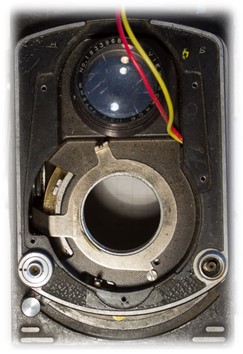
The shutter/lens has a connection to the body because of the flash sync wires.
Hold the shutter/lens while turning over the camera.
 Place the shutter/lens aside.
Note: Try not to break off the wires, unless you have a soldering iron.
NOTE: there may be shims. Do not lose these as these calibrate the lens for optimal focus on this particular body.
From top to bottom there are four layers.
There is probably is a focus adjustment washer, which may be stuck to the bottom of the shutter/lens when you pull it off.
The top reset ring and bottom charge ring washer are hooked (on the left) to levers.
There is a shutter seat spacer ring in between.
Pull out all three one by one as you will have to slightly angle the top/bottom rings to unhook them. You can turn the film winder to change position of one lever.
There will be a charge ring washer on the bottom.
Remove the three heavy duty screws.
Put the shutter/lens back in the hole for safe keeping.
You can now pull straight up to remove the lens plate.
Note that the viewing lens is attached to this plate.
If the shutter button is not moving freely you can take the opportunity to put some Ronsonol on it and work the gunk out of it.
Note: the outer ring turns to lock the button up/down.
 Remove the four screws holding the lens plate guide.
The top set also secures the rail guide.
Put the lens plate guide and rail aside.
Remove the focus distance scale that sits above the focus knob (my images above show that I removed it sometime before).
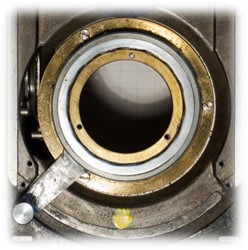 Turn the inner focus helicoid until it is flush.
Make a couple of marks across the three for reference with a scribe. This will be used as reference when you put it back together.
Loosen the three large screws that hold the entire focus set, and remove it.
You will need to remove the focus lever. This lever is held on by four tension screws around the edges. Loosen them and pull of the lever straight up.
WARNING: as I mentioned before, the focus lever is made of pot metal. This is a brittle metal so be careful of it. In one instance the screws were also brittle.
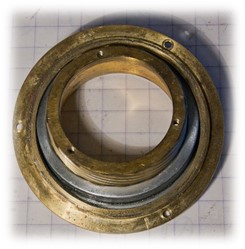 Now you can take the rings and helicoid apart. The helicoid will just turn out.
Clean.
Dab a little bit of Super Lube on the helicoid.
When turning the helicoid back in it should do so freely. You will probably spend some time here as it may take some time to get it to catch a groove.
Twist it down flush and check your reference marks. It they don’t match up you will have to twist it out, and turn it slightly so that it catches a different groove.
Note: be patient. One time it took me 15 minutes just to get it to grab a groove. Don’t force it !!
Once you have that done you can put the focus lever back on … make sure to match your reference mark !!
Warning: Do not over tighten as this may break the pot metal.
 Now you can go backwards through this post to put everything back together again.
The rings will need to be hooked back to the levers on the left. You can turn the winding lever to make it easier.
When putting the shutter/lens back on there is a small registration hole that fits the pin in the back.
After tightening everything, check the focus. Set the focus to infinity and view a very distant object. If this is not in focus then you will have to go back to adjust the position of the focus lever.

Hey! Thank you so much for doing this write up! Couldn’t have fixed the focus on my camera without it.
I do have some issues getting it all back together though. Or well, back together while maintaining functionality at least! 😛
You have another model then I do, but it’s probably about the same. On the backside of the shutter there’s a small lever. Seen here: http://cl.ly/image/053U3q3d1Q2z which fits into the crank mechanism here: http://cl.ly/image/1g192o0D1J1T
When winding the crank this lever is turned to charge the shutter. However if the small lever is not returned to it’s original position the shutter can’t be fired. The button can’t be pressed.
And in there lies my problem, the small lever won’t return and hence I can’t fire the shutter. I have to open up the camera again to return it and then fire the shutter (which is not optimal if you’re out and about taking pictures! ;)).
I don’t know if my problem is that I broke som small spring that’s supposed to make it flip itself back or if I can’t get it to hook into the crank correctly.
Would be super happy for any advice you would have regarding this issue! I love my Autocord and would love to be able to fix this myself! 🙂
I think you have the model with a Citizen MVL shutter. I have never had a camera with one of those.
If the cocking lever does not return after firing the shutter, then I would have to say that it is gummed up somewhere. You should open up the shutter from the front and give it a Ronsonol bath and exersize.
Thanks for the answer! You are correct about the shutter. I actually found this old service manual: http://webpages.charter.net/wolfdagon/Autocord%20Service%20Manual.pdf In where they suggest that problems with the shutter release might have to do with parallelism between the contact faces of the shutter holder and the charge ring (page 19 in the manual). So I went back and made sure I had actually tightened everything and aligned the rings correctly!
That did the trick!
Did a quick write up on my experiences opening a camera up for the first time on my own blog! http://iamsim.me/minolta-autocord-focus-helicoid/ 🙂
Now I need to go get som Ronsonol so that I can fix the longer shutter speeds!
Thanks again for this post! It really helped me out!
Great that you got it figured out. That link just suddenly reminded me that I did have that Service Manual, but I did not name it with the CDS camera model … so stupid me, I did not look at it.
The Minolta Autocords used different types of shutters … Optiper MXS, Optiper MXV, Sheikosha MX, Sheikosha Rapid, Optiper M, Optiper MVL, and finally the Citizen MVL.
You have to be aware when dealing with camera servicing that even though the camera model name appears similar, there may be variations over the years of production.
Regarding the shutter; it says Optiper MVL on the outside (front of camera) and Citizen engraved on the actual shutter. Do you know anything about that?
Also, do you know if there are any major differences between the different shutters? Different price ranges or just different production years?
I think Citizen made the Optiper shutter.
http://www.wctatel.net/web/crye/a-cord.htm
Please help me! I’m so close to finishing the restoration. I need to remove the shutter in order to clean and put together the aperture again because they have popped out and have oil. I have the same camera as the one you illustrate. How do I remove the shutter from the back? I see you said the brass must be twisted off, which one is it that twists off, the one with the rear end lens or the outer one next to the focus ring. Hope you can understand and help.
Hmm, I have never had to open it up to get at the aperture blades.
If you are asking how to take the entire shutter off the body … from the rear you pull off the light shield, then turn the outer ring off.
After that, I can’t help you.
Which bone is te outer ring? The black or brass colored ring?
The brass ring is part of the focus helix. You wont remove that.
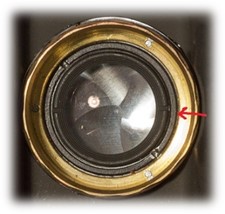
The first black ring inside the brass.
Inside that is the rear lens element.
This is so useful….I have bought an Autocord – SN 226904 – and the focus works but is very inaccurate. I imagine someone – an expert who did a full
” CLA ” job on it, has assembled it incorrectly. Should there be only one position that is correct, and is that marked internally – i.e. if someone has not done the reference scribe job you mention above – ” Once you have that done you can put the focus lever back on … make sure to match your reference mark !! ” Thanks.
It looks like the Optiper shutter but I can’t confirm it. https://dustygrain.com/minolta-autocord-versions/
This one is a Seikosha.